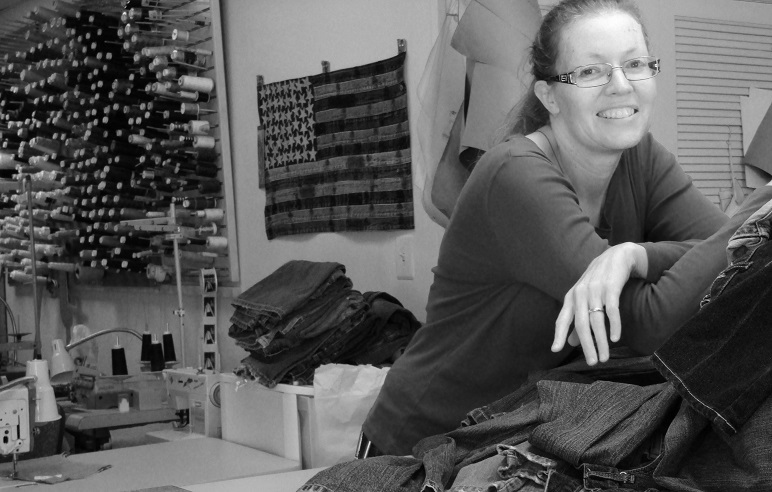
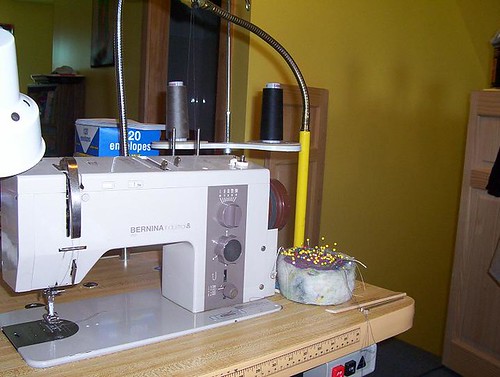
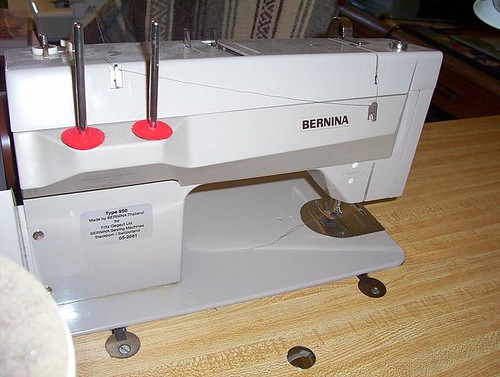
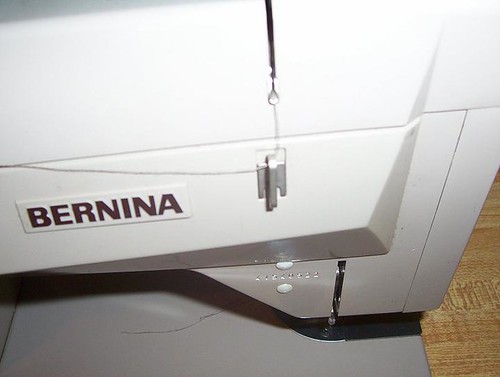
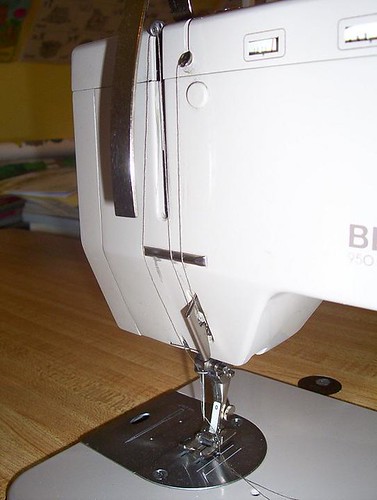
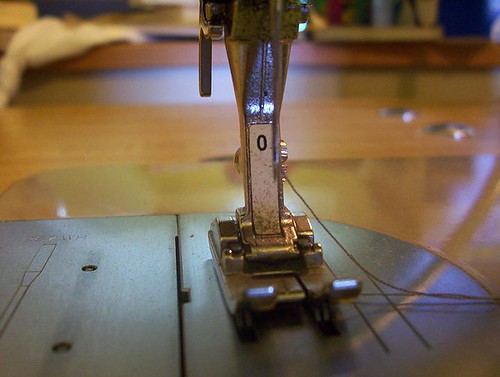
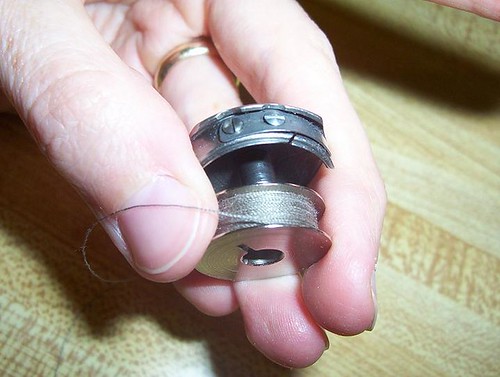
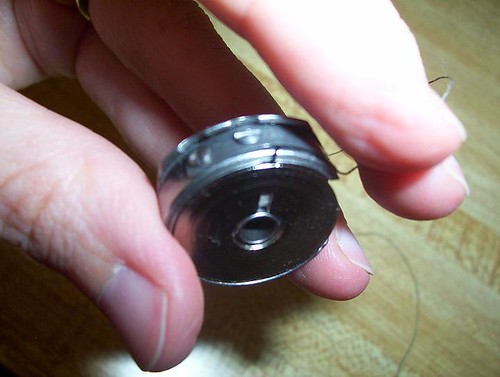
This is how I thread my Bernina 950. This is a pic of mine, I added a thread stand after I bought it. This is a view from the back. Right now the machine is threaded from the thread stand. If using cone thread and a thread stand, first the thread goes through the top of the stand, then the hook behind the thread post, then the hook behind the take up lever. If you are using a spool on the thread post, the only hook you use is the one behind the take up lever. Another closer view of the hook behind the take up lever. And showing the thread going into the guide toward the front of the machine. The thread comes from the back on the right through the guide. Down and under the thread regulator, up through the take up lever, and down through the thread guide just above the needle, then through the needle. Hard to see, but it is important to note that the needle is inserted slightly off center. The eye should be facing between the 6 and 7 on a clock. The long groove is the front of the needle. Organ 16X231 BALL POINT Needles and Organ 16X231 SHARP Needles . This is how the bobbin goes in the bobbin case. The thread rolls off over in the direction you see the thread going. Another look. Bobbin in case. Sorry its a little fuzzy, you get the idea... I hate winding bobbins in the middle of a project (thought you can with the Bernina 950)or unwinding bobbins for a new thread color. I bought 20 extra Bobbins as soon as I could find them. update September 24, 2017: I made a video!
1.Don't turn the hand wheel backwards. Never. It should only be turned towards you. This is something that comes naturally to me because I learned to sew on a treadle machine. I'm surprised at how many people try to do this. This is the best way to mess up the timing on your machine.
2.Leave the tension on your machine alone! The only reasons you should be touching it are for speciality feet, special needles or some machines ask the tension dial to be set differently for the button hole. First rethread, make sure the bobbin is in correctly, and make sure the needle is the right size and type for the fabric you are sewing. Otherwise leave it on the factory setting.
3.If you want to slow the fabric down, step lighter on the presser foot. Don't slow the fabric down by holding it back. You will get an uneven stitch and just might break your motor too.
4.The sewing machine sews in a straight line. You are not making the sewing machine sew straight, you are guiding the fabric under the presser foot in an even fashion. If you veer off correct gently, don't try to do it too fast.
That is all I can think of right now, I've been reading Yahoo answers and I'm not happy with some of the sewing advice that is given. I really have to stop reading. They are always telling people to adjust tensions! I RARELY touch my tensions. I have to stop reading them. Someone is insisting that you have to thread your machine with the presser foot up?!? Huh? What nonsense! As if that makes any difference at all. In fact, I'd say I'm more likely to thread the machine with the presser foot down! My Industrial machines have a knee lift, so the presser foot is definately down when the machine is threaded. And with my home machines, I put the foot down when I'm threading to get it out of the way of the needle. The only time I can think of it making a difference is if there is an auto threader that requires it to be up.
Christine Jonson Patterns now has a blog! Keep updated on what is new in Christine's studio, what kind of new fabrics she has found and when the new patterns are coming out.
Christine hired me in her retail shop in 1995 and it began my career in sewing. I've learned an incredible amount from her over the years. She is always willing to pass on what she knows. I hope you can learn from her too!
I had a great time at the SORR booth at the Green Street Fair. As always it was fun to be around others who were interested in sewing. I took a picture of the booth at the beginning of the day and promptly forgot about my camera. Sigh... I hate when I do that...
Anyway here is how it looked before the fair officially opened:
I really have mixed feeling about them. On the one hand, they are a reasonably priced, lightweight, multi function sewing machine and operate at a slow speed. I think it would be a good machine for a young person just beginning to take an interest in sewing, especially if you weren't sure that the interest would continue. On the other hand, they had some trouble with multiple thicknesses and their lightness could become a problem quickly if the interest did proceed quickly. They would be good mostly for quilting fabrics or other lightweight materials. And larger projects could be a problem because they might drag on the machine. So you see my indecision...
I still enjoyed myself. I spent about 4 hours in the tent. I helped to make a shawl, turban and some tote bags. I hope to have another opportunity. I'll keep you posted on local swaps as I find out about them. I'd love to have a permanent swap with a huge pile of recyclables, sewing machines and interested stitchers!
You know you are getting old when you hear that crackle of elastic that has stretched its last stretch. Or hey! Maybe you aren't old, but you love a good thrifty find or vintage garment.
I've got a favored pair of pants, I bought them at a yard sale in 1995, for a dollar, I can remember the rack on the porch in Royal Oak, MI where I found them. Isn't that strange, that I can remember? I've called them my elephant pants, but I always get compliments when I wear them.
The old elastic is overlocked (serged) in and stitched down. I'll be redoing it the same way, but I'll offer suggestions for sewing if you don't have an overlock machine:
Click on any picture to see a larger photo. Find a thread to clip in the right side, I use my Fiskars Softouch clips, but you can use a seam ripper. Clip between the layers, gently pulling apart, 2 to 4 threads at a time.
I secured the pocket with a pin because it doesn't go to the top of the waistband and because I don't want to waste time later figuring out which way the pocket goes.
Next cut the threads on one side of the elastic, then separate the layers again, slightly pulling and cutting a small amount at a time.
Old elastic-New elastic. My new is a little thinner, but that is OK because I plan on cutting a little of the fabric off with the overlock to have the stitches in securely. It is a good idea to replace the elastic (braided 1'' wide) with as similar as you can so you aren't changing the way the garment fits or changing the seam allowances.
Just wanted to show here that I switched the direction of the pin so it wouldn't have to be taken out while overlocking.
I don't have a good and fast rule for elastic length, only that whatever you use needs to be shorter than you think. Elastic grows every time you sew through it. If you know of a good chart I'd be happy to see it. Another suggestion is to look at a commercial pattern that has the same kind of waistband you are doing and use your corresponding measurement.
First butt ends together, extra secure. I'm using my Bernina 950
I mark the elastic with a pen in 1/4 before sewing.
Next using my Juki MO644D to overlock the elastic to the pants. I match my pen marks to the side seams and center front/back. I'm also taking off about 1/4" with the knife blade. (I should have pressed the waist before sewing, but what can I say :D) If you don't have an overlock, finish the raw edge at the waist with you preferred method and sew with a straight stitch or zigzag to secure the elastic and the following step works the same way.
Finally stitch the elastic down with a straight stitch, you can do right side up too, I just wanted to make sure I caught the pockets.